 in Word")
You’ve numbered the sections in your Word document neatly, and ready to refer to them with the elegant ‘§’ sign, the symbol is nowhere to be found? Shouldn't so essential be easier to find and insert? Find out here how to insert the section symbol (statute sign) using Microsoft Word for Windows, Mac, the web, and mobile devices ⤓ to type ‘§’ and refer to sections in your document or legal texts, for example. You can even set up your own keyboard shortcut for the sign.
On This Page
How to Insert the Section Symbol ( § ) in Microsoft Word for Windows
Time needed: 1 minute
To insert the section symbol ( § ) in Microsoft Word for Windows:
- Position the text cursor where you want to place the section symbol in the document.
Spacing: Typically, precede and follow the section sign with a protected, non-breaking whitespace character so the section symbol can appear neither at the beginning or the end of a line, isolated either way from its context.
- Press Ctrl Alt S.
No shortcut: If the keyboard shortcut does not work, see below for setting it up.
Custom keys: You can also change the section symbol keyboard shortcut for Word, of course; see below.
Six characters saved?
Tips help fuel these email and tech how-tos.
Using the Ribbon
To insert the section sign using the Word for Windows ribbon:
- Put the text cursor where you want to insert the section symbol.
- Go to the Insert tab on the ribbon.
- Click Symbol in the Symbols section.
No “Symbol”: If you do not see Symbol initially, click Symbols first. - Select § (Section Sign) from the menu that has appeared.
Their word: Microsoft include information on inserting symbols in Office help.
It looks a bit similar: How to Insert a German Double S ( ß ) in Word
How to Enter the Section Symbol in Word for Mac
To add the section symbol to a document in Word for Mac:
- Put the insertion cursor where the section sign is to appear.
- Press Option 6.
Other keyboards: This is the standard US-English macOS key for the section sign; other keyboards offer other combinations to insert the section symbol on a Mac, and you can set up your own shortcut for Word — see below.
Non-breaking space: Typically, surround the section sign with non-breaking spaces.
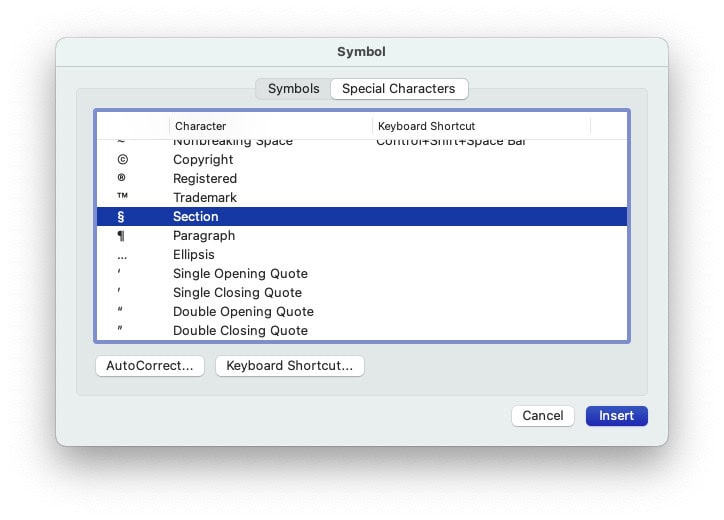
Using the Ribbon
To add the section sign using the ribbon in Word for Mac:
- Go to the Insert tab on the ribbon.
- Click Advanced Symbol.
- Go to the Special Characters tab.
- Highlight § Section.
- Click Insert.
Add the Section Sign in Word Online (for the Web)
To type the section sign in Word Online on the web:
- Use the method to insert the section sign offered by the operating system.
Windows: How to Type the Section Symbol ( § ) on Windows
Mac: How to Type the Section Symbol ( § ) on a Mac
Linux: How to Insert the Section Sign on Linux
No symbol dialog: The symbol dialog in Word for Office Online includes many a special character — but not the section sign. Word on the web does not include a keyboard shortcut either.
Use the Section Symbol in Word for iOS and Android
Word for iPhone and Word for Android do not include commands or shortcuts to enter the section symbol themselves.
You can insert section symbols using the respective keyboards, of course:
- iPhone: How to Find the Section Symbol ( § ) on the iPhone Keyboard
- Android: How to Type the Section Symbol on Android
How to Insert the Section Symbol ( § ) in Word: FAQ
Can I set up a custom keyboard shortcut for the section sign?
Yes.
In Word for Mac and Word for Windows, you can change the keyboard shortcut for typing the section symbol.
Word for Windows
To set up your own keys to type the section sign in Word for Windows:
- Go to the Insert tab on the ribbon.
- Select Symbol (or Symbols | Symbol).
- Now choose More Symbols….
- Go to the Special Characters tab.
- Highlight § Section.
- Click Shortcut Key….
- Click under Press new shortcut key:.
- Now press the key combination you want to use for the section sign.
Example: Hit Ctrl Alt S, for instance. - Click Assign.
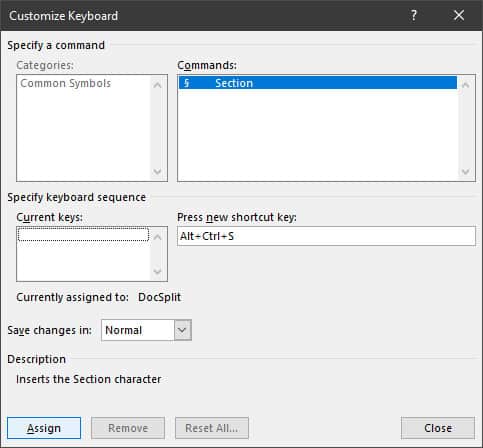
- Optional: Highlight an existing shortcut under Current keys: and click Remove to delete the shortcut.
- Click Close
- Now click Cancel.
Word for Mac
To change the keyboard shortcut for inserting § in Word for Mac:
- Open the Insert tab on the ribbon while working on a document in Word.
- Click Advanced Symbol.
- go to the Special Characters tab in the Symbol dialog.
- Highlight § Section.
- Click Keyboard Shortcut….
- Click in the Press new keyboard shortcut field.
- Now press the keyboard combination you want to use for inserting the section symbol.
More than one: You can set up multiple shortcuts; separate them with commas. - Click Assign.
- Now click OK followed by Cancel.
(Tested with Word for Windows 2403–2603 and Word for Mac 16.54; first published November 2021, last updated May 2026)