
Your computer just threw a baffling error at you or a fleeting confirmation — and you want to save it for later? Want to share something from your screen easily? Find out here how to make a screenshot using Microsoft Snipping Tool and Snip & Sketch on Windows 10 and Windows 11 ⤓.
On This Page
How to Make a Screenshot Image with Snipping Tool (Snip & Sketch) on Windows
Time needed: 3 minutes
To take a screenshot (of the whole screen or just a part) in Windows 10 or 11 with Snipping Tool (Snip and Sketch on Windows 10):
- Open Snipping Tool or Snip and Sketch.
Snipping Tool shortcut: You can also press Windows Shift S to immediately make a screenshot or set up the Print key to do the same.
- Click New.
Screenshot countdown timer: Click the downward-pointed arrowhead (˅) next to New in the Snip and Sketch toolbar to add a delay before grabbing the screen.
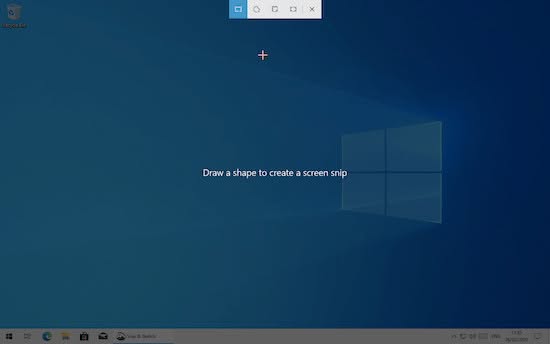
- Choose how much of the screen you want to capture:
Rectangular Snip: Grab a rectangle, say a window. Note that you cannot have Snipping Tool select a window for you; you do have to drag the rectangle around it.
Freeform Snip: Select any area on the screen; you can get creative, Snipping Tool will always complete your form with a straight line.
Window Snip: Grab a screenshot of a highlighted window as is (i.e. if you select a window that is overlapped by another window, the overlapping part will be snipped).
Full-Screen Snip: Grab the whole screen.
- If you initiated the screenshot with a keyboard shortcut, optionally click the notification that appears to open the screenshot for annotating.
Pasting: The screenshot has been copied to the clipboard, and you can paste it into another image editor or save it to disk from the clipboard.
Saving to disk from Snipping Tool: You can also have Snipping Tool prompt you to save screenshots to disk. - Optionally, annotate and edit the screenshot you have taken using Snipping Tool’s markup tools.
Redact: If you captured something you don’t want to share, you can blacken out text in a Snipping Tool screenshot.
Gone snipping?
Tips help fuel these email and tech how-tos.
How to Make a Screenshot Image with Snipping Tool (Snip & Sketch) on Windows: FAQ
Snipping Tool is not showing the preview; what can I do?
If you do not get preview notifications for screenshots you take, you can enable these previews in Windows (and find the screenshots in their default location or save them from the clipboard, of course).
No scrolling and sketching needed: How to Make a Website Screenshot in Firefox
Where can I find the Snip & Sketch download for Windows 10?
You can download and install the screenshot app from the Microsoft Store for free:
- Visit Snip & Sketch in Microsoft Store.
- Click Get.
- Now click Install.
Where is the Windows 10 Snip & Sketch folder located?
Microsoft Snipping Tool is installed to the C:\Program Files\WindowsApps\ folder as Microsoft.ScreenSketch .
You can find it in the Start menu as Snip & Sketch at the top level (not in any Start menu folder).
Settings for the app are in the folder C:\Users\{user name}\AppData\Local\Packages\Microsoft.ScreenSketch_{string}\Settings .
Can I rotate an image in Snipping Tool?
No.
Snipping Tool and Snip and Sketch let you crop but not rotate a screenshot.
You can select Edit in Paint in the toolbar to open the image in Paint, for example, where you can rotate.
How can I remove the ruler or protractor from my image?
To hide the ruler if it is shown in a screenshot:
- Click the See more menu button.
- Select Hide ruler from the menu.
To remove the ruler or protractor in Snipping Tool 11.23:
- Click the Ruler icon in the toolbar.
- Select the highlighted item from the menu that has appeared to remove it.


(Tested with Snipping Tool 11.2304–11.2602 and Snip & Sketch 10.1907; first published December 2018, last updated June 2026)