
Want to strike through text or underline key parts with casual precision? Find out here how to draw and highlight in a straight line with the ruler in Windows Snipping Tool ⤓ (or Snip and Sketch for Windows 10).
On This Page
How to Draw Straight Lines with the Ruler in Windows Snipping Tool (Snip and Sketch)
Time needed: 1 minute
To draw straight lines (to highlight, say, or strike through text) in Snipping Tool for Windows 11 and Snip and Sketch for Windows 10 using the built-in ruler:
- Show the ruler in Snipping Tool.
Here’s how: Press Ctrl R or select Show ruler from the three dots See more menu.
Snipping Tool until Version 11.2312: Click the Ruler or the Protractor icon in the Snipping Tool toolbar and choose Ruler from the drop-down menu again if the protractor was selected. - Put the ruler where you want to draw a line.
Move: To position the ruler, click and drag.
Rotate: You can also rotate the ruler to change its angle. - Choose the pen, pencil, or marker you want to use for drawing the straight Snipping Tool line.
Color and size: Click again on a tool to change its size and color.
Snipping Tool keyboard shortcuts: Use Alt B for the pen, Alt I for the pencil (only in Snip and Sketch) and Alt H for the highlighter. - Draw along the ruler to add a straight line.
Edges: You can draw along all the ruler’s edges, not just the top.
Rectangles: Using the ruler, you can also highlight with rectangular boxes in Snipping Tool.
Redacting: You can use lines to redact text, but Snipping Tool also offers means to blacken out text safely.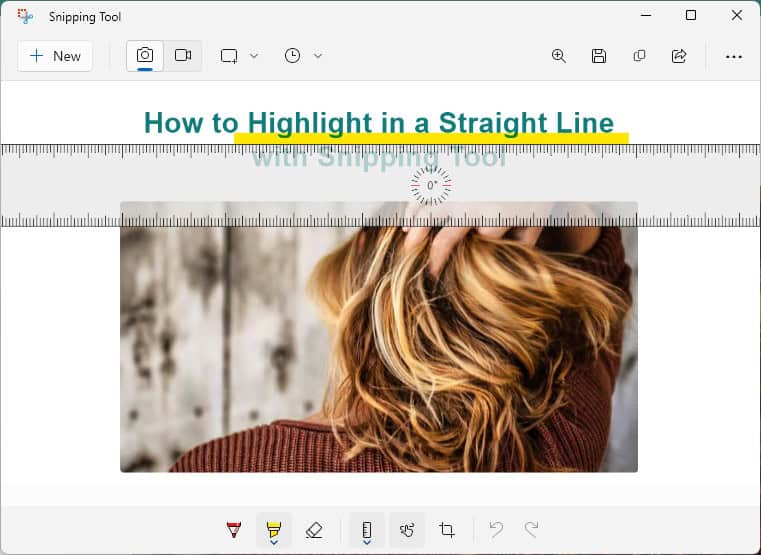
Ruling the ruler?
Tips help fuel these email and tech how-tos.
How to Draw Straight Lines with the Ruler in Windows Snipping Tool: FAQ
How do I move the ruler?
Click and drag the ruler (while holding the mouse button pressed) to move it.
Can I change the angle?
Yes.
You can also rotate the ruler to change its angle and, say, highlight in an angled but still straight line.
Not just straight lines: Using the protractor, you can also draw perfect circles in Snip and Sketch
Can I erase in a straight line along the ruler in Snipping Tool?
Yes.
You can use the eraser following the ruler as a guide in Snipping Tool.
Do remember, though, that using the ruler does not change how the rubber works; it will still
- delete objects and contiguous lines, not parts of objects.
Can I draw in a straight line in legacy Snipping Tool?
No.
Legacy Snipping Tool (for Windows 8 and 10, for instance) only lets you highlight freehand. (You can, of course, move a mouse or pen on a tablet along a ruler to highlight along a mostly straight line.)
The ruler is missing in Snipping Tool; where can I find it?
With version 11.24xx, the ruler has been moved from the toolbar to the See more menu in Snipping Tool.
To show the ruler in Snipping Tool when it is missing:
- Click See more.
- Select Show ruler.
Keyboard shortcut: You can also press Ctrl R to show and hide the ruler in Snipping Tool.
(Tested with Snipping Tool Version 11.2305–11.2601 and Snip and Sketch version 10.2008; first published March 2021, last updated May 2026)