

Want to use the screenshot you just took — including all your highlights; crops and annotations? Find out here how to quickly copy a screenshot from Snipping Tool ⤓ to the Windows clipboard for easy pasting anywhere.
On This Page
How to Copy a Screenshot to the Clipboard from Windows Snipping Tool
Time needed: 1 minute
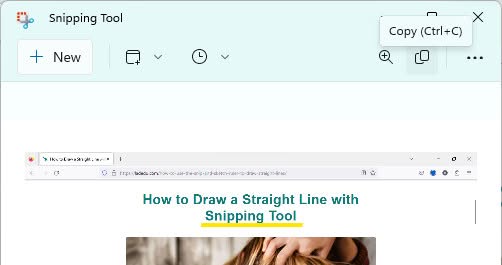
To copy a screenshot you have made with Windows Snipping Tool (including all annotations, highlights, and other changes) to the clipboard:
- Make all annotations and changes to the screenshot in Snipping Tool.
- Click the Copy button in the toolbar.
Snipping Tool keyboard shortcut: You can also press Ctrl C to copy the current image to the clipboard for pasting.
Automatic copying: You can also have Windows Snipping Tool keep updating the image in the clipboard for pasting as you make changes (such as highlighting); see below.
Out of the clipboard: You can always save the screenshot image from the Windows clipboard to a file on disk.
Their word: Microsoft include information on working with screenshots in Snipping Tool help.
“Great artists copy.”
Tips help fuel these email and tech how-tos.
How to Have Snipping Tool Copy to the Clipboard Automatically (and Continuously)
To set up Windows Snipping Tool so it will keep the image in the clipboard up to date for pasting as you make changes:
- Click the three-dots See more menu button in Snipping Tool.
- Select Settings from the menu that has appeared.
- Enable Automatically copy changes (or Auto copy to clipboard).

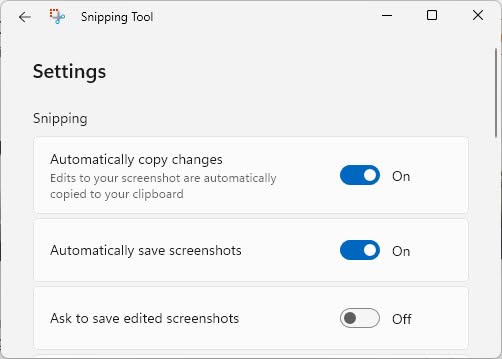
Now, the original screenshot as well as all changes you make to it are immediately copied to the Windows clipboard (replacing whatever was in the clipboard before, of course).
The clipboard can have a memory:
Copy-Paste Multiple Items in Windows 11 (Clipboard History)
(Tested with Snipping Tool 11.2305–11.2602; first published February 2023, last updated June 2026)