
Juggling with windows and files just to take a screenshot and paste it into a message or document? Annoyed by all those stray screenshot files piling up on your desktop? Find out here how to take a screenshot on a Mac straight to the clipboard for instant pasting — no clutter left behind.
On This Page
How to Take a Screenshot to the Clipboard for Instant Pasting on a Mac
Time needed: 1 minute
To take a screenshot and copy it to the clipboard instantly for pasting anywhere (anywhere a picture goes) on a Mac:
- Have the content you want to copy to the clipboard as a screenshot visible on screen.
- Press the key combination for taking a screenshot of the entire screen or a selection; see below.
Taking control: Typically, add the Control key to the regular Mac screenshot keyboard shortcut.:
Example: Press Command Control Shift 4 (four) to take a screenshot of a part of the screen.
Default for all: You can also make the clipboard the default for all screenshots; see below. - If you copy part of the screen: make the selection for your screenshot.
Here’s how: Use the mouse cursor to draw a rectangle on the screen or press Space and click to select a window to copy.
Drawing rectangles: By default, clicking and holding will draw a rectangle starting from its top left corner on the screen, but you can use key combinations to modify this behavior, e.g., to expand the selection from the center.
- Paste the image from your clipboard or clipboard history.
Their word: Apple include information on taking screenshots in a support article.
Took Control of your screenshots?
Tips help fuel these email and tech how-tos.
Keyboard Shortcuts for Screenshots to the Mac Clipboard
| Mac Screenshot to Clipboard Shortcut | Screenshot Area |
|---|---|
| Command Control Shift 4 | Selection made with the cursor |
| Command Control Shift 4 followed by Space | Selected window |
| Command Control Shift 3 | Entire screen |
All screenshot shortcuts: How to Make a Mac Screenshot with a Keyboard Shortcut
Copying more than one item? How to Access Your Mac’s Clipboard History (Never Lose a Copy)
Taking Screenshots to the Clipboard from Terminal
Using screencapture with the -c option, you can also save screenshots straight to the system clipboard from the macOS Terminal.
Example: screencapture -ci will take an interactive screenshot and save it to the clipboard.
How to Take a Screenshot to the Clipboard for Instant Pasting on a Mac: FAQ
Can I have the Screenshot app save to the clipboard, too?
Yes.
To copy a screenshot to the clipboard instead of saving it to a chosen location on disk:
Can I make the clipboard the default location for screenshots?
Yes.
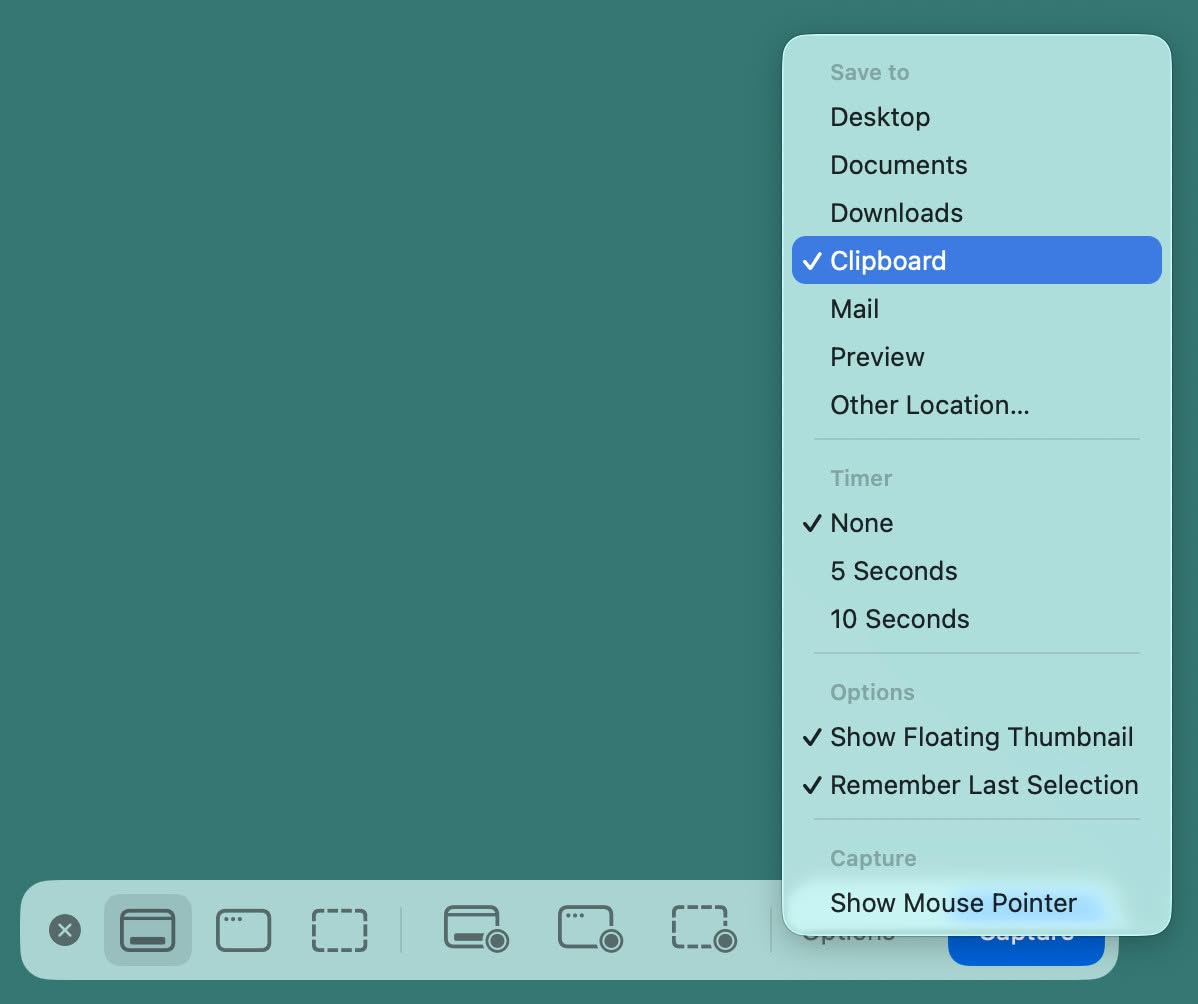
To have the Screenshot app as well as the regular screenshot keyboard shortcuts copy to the clipboard by default:
- Open Screenshot.
- Select Clipboard as the saving location for a screenshot.
- Enable Remember last selection in the Options menu (under Options).
Caution : Unless you have clipboard history turned on for your Mac, new screenshots will overwrite the clipboard contents — Including previous screenshots — without a trace.
Can I copy and paste multiple screenshots?
Yes.
To create a series of screenshots rapidly without saving them to disk automatically:
- Enable clipboard history on the Mac.
- Take any number of screenshots copied to the clipboard.
- Paste the screenshots from clipboard history using Spotlight.
(Tested with macOS Tahoe 26.0–26.5; first published October 2025, last updated May 2026)