

Wrestling with your MacBook’s trackpad just to drag a window or select a few lines of text? Tired of the slow and clunky click-and-hold method of dragging, looking for a masterful way to drag, drop and select text with a trackpad instead? Find out here how to enable and use three-finger drag on a Mac ⤓.
On This Page
How to Enable and Use Three‑Finger Drag on a Mac Trackpad
Time needed: 2 minutes
To turn on three-finger dragging on a Mac (with a MacBook, for instance, or Magic Trackpad):
- Open System Settings (or System Preferences) on the Mac.
Here’s how: Select System Settings, for instance, from the Apple symbol () menu.
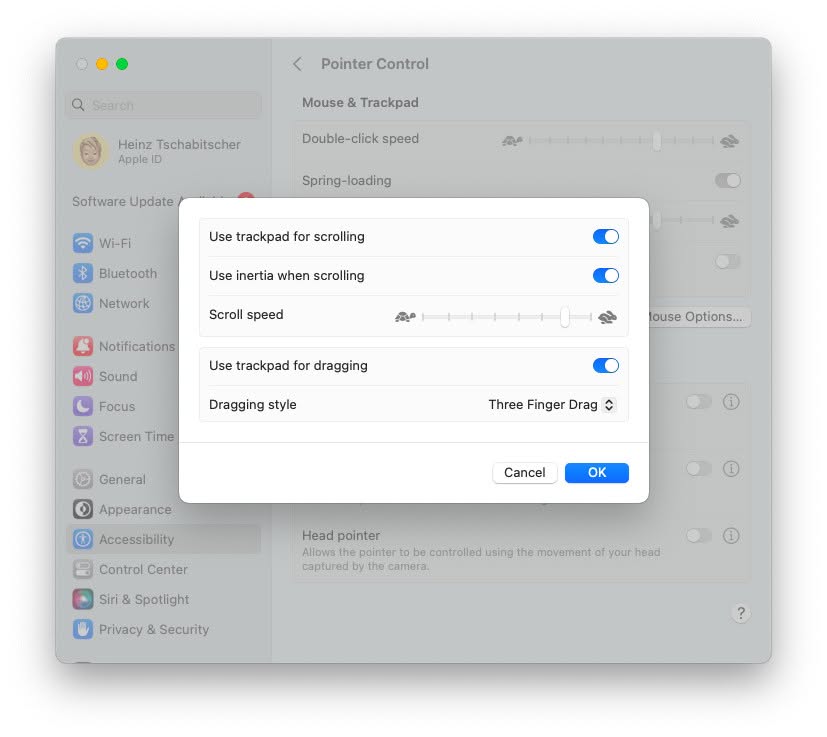
- Go to the Accessibility.
- Open the Pointer Control category.
- Now click Trackpad Options….
Before macOS Ventura: Go to Mouse & Trackpad, then select Trackpad Options….
- Enable Use trackpad for dragging.
Before Ventura: Turn on Enable dragging.
- Now choose Three Finger Drag under Dragging Style (or from the dragging drop-down menu).

- Click OK.
Their word: Apple include information on setting up three-finger dragging in a Mac support article.
Already dragging your folders faster?
Tips help fuel these email and tech how-tos.
How to Use Three Finger Drag on a Mac
To make the most of three finger drag on your Mac:
- Position the cursor where you want to start dragging.
- With three fingers on the trackpad, move into the direction you want to drag.
Endless dragging: See below for endless dragging.
Dragging to folder inside folders: How to Have Folders Open on Mouse Hover in Mac Finder - Let go of the trackpad to end the dragging.
Ending a drag without action: See below for letting go without any action (e.g., moving a file).
How to Enable and Use Three Finger Drag on a Mac: FAQ
I’ve reached the end of my trackpad with the three fingers; how can I continue three finger drag?
To drag without the limits of the physical trackpad on a Mac using three fingers
- Start three finger drag as above.
- Let go of one finger.
Which fingers: You can let go of any finger. I’d suggest you start dragging with index finger, middle finger and ring finger of one hand, though, then let go of the index. - With two fingers on the trackpad (and stationery), scroll with the lifted finger as if you would move the cursor.
What happens: Instead of letting go or moving only the cursor, you will move the selection or selected item.
Again and again: You can lift the third finger and start scroll as many times as you wish or need.
How can I cancel dragging without dropping the file or another action?
To end dragging without taking any action:
- Press Esc with the fingers still on the trackpad.
For what can I use three finger dragging?
Three finger drag on a Mac always replaces clicking and dragging on a mouse.
You can use three-finger dragging to
- move windows (using their title bars),
- drag and drop documents or
- select documents (drawing an outline around them) in Finder, or to
- highlight text,
for instance.
How can I copy (instead of moving) with Mac three finger drag?
To copy a file in Finder:
- Hold down the Option key while you drag and drop it.
Just then: It’s enough to press the key when you release the three finger drag.
(Tested with macOS Tahoe 26, Sequoia 15, Sonoma 14, Ventura 13, Monterey 12 and Big Sur 11; first published August 2021, last updated April 2026)