
Your Mac is running low on storage? Deleted a large number of temporary files? Need to purge certain files immediately? Find out here how to empty the trash on a Mac ⤓, empty it automatically, immediately delete selected files, and even bypass the trash using Terminal.
On This Page
How to Empty the Trash on a Mac
Using the Dock
To empty the Trash on a Mac at any time with the Trash in the macOS Dock:
- Click on the Trash icon in the Dock with the right mouse button.
Here’s where: The icon is on the right or bottom edge of the Dock (depending on the location of the Dock itself). - Select Empty Trash from the menu that has appeared.
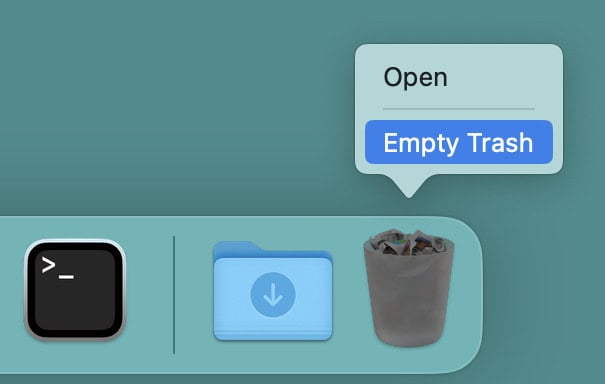
- Click Empty Trash to confirm if you are prompted.
No prompt: You can disable the confirmation prompt in Finder settings; see below.
Time to purge? With a tool like Bananabin, you can get subtle reminders to empty the Mac trash.
Their word: Apple include information on using the trash in the Mac User Guide.
Mac feeling lighter already?
Tips help fuel these email and tech how-tos.
Empty the Bin Using the macOS Menu
To purge items from a Mac’s trashcan using mouse and menu:
- Open or Switch to Finder on the Mac.
- Select Finder | Empty Trash… from the menu.
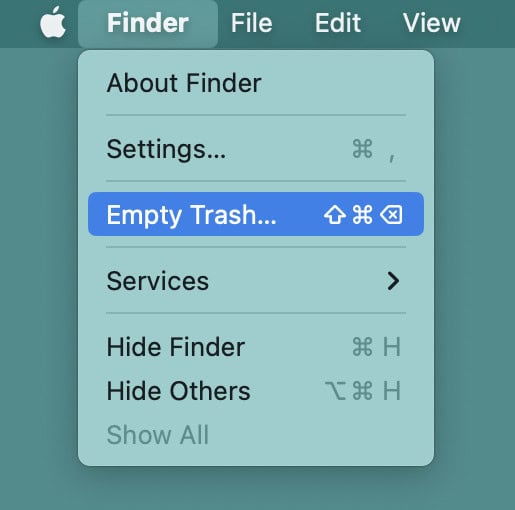
- Confirm emptying if you are prompted.
Using the “Empty Trash” Keyboard Shortcut
To empty the Trash using the keyboard alone:
- Switch to Finder.
- Press Command Shift Backspace.
- Confirm the purge if macOS prompts you.
How to Empty the Trash Automatically on a Mac
Time needed: 2 minutes
To have macOS delete files automatically after they have been in the Mac Trash for 30 days:
- Open Finder.
Here’s how: Click Finder in the macOS Dock, for instance, or use a shortcut to open Finder.
- Select Finder | Settings… from the menu.
macOS keyboard shortcut: In Finder, you can press Command , (comma) to open its settings.
- Go to the Advanced tab.
- Enable Remove items from the Trash after 30 days.
- Close the Finder Settings window.
Empty the Trash from Mac Terminal
To empty the Finder Trash from the Mac Terminal command line, you can use osascript to send the command to Finder:
- Type
osascript -e 'tell app "Finder" to empty'on a Terminal prompt.
Shortcut: You can add an alias to ~/.zshrc, of course, to shorten the command.
Example:alias rmtr='osascript -e '\''tell app "Finder" to empty'\''' - Press Enter.
- Click Allow if you are prompted whether Terminal can control Finder.
How to Empty Select Files from the Trash
To permanently delete only one document or a certain set of files from the Trash on a Mac:
- Open the Trash in Finder.
Here’s how: Click the Trash icon in the Dock.
Go to folder: You can also use the “Go to Folder…" keyboard shortcut in Finder, of course. - Select all files you want to purge immediately.
Here’s how: You an drag over a group of files to highlight them and press Command while you click on any file to add or remove it from the selection.
Search: Use Command F to bring up search and focus on the files you want to delete immediately; in search results, you can press Command A to highlight all found files. - Click on any highlighted item with the right mouse button.
- Select Delete Immediately… from the menu that has appeared.
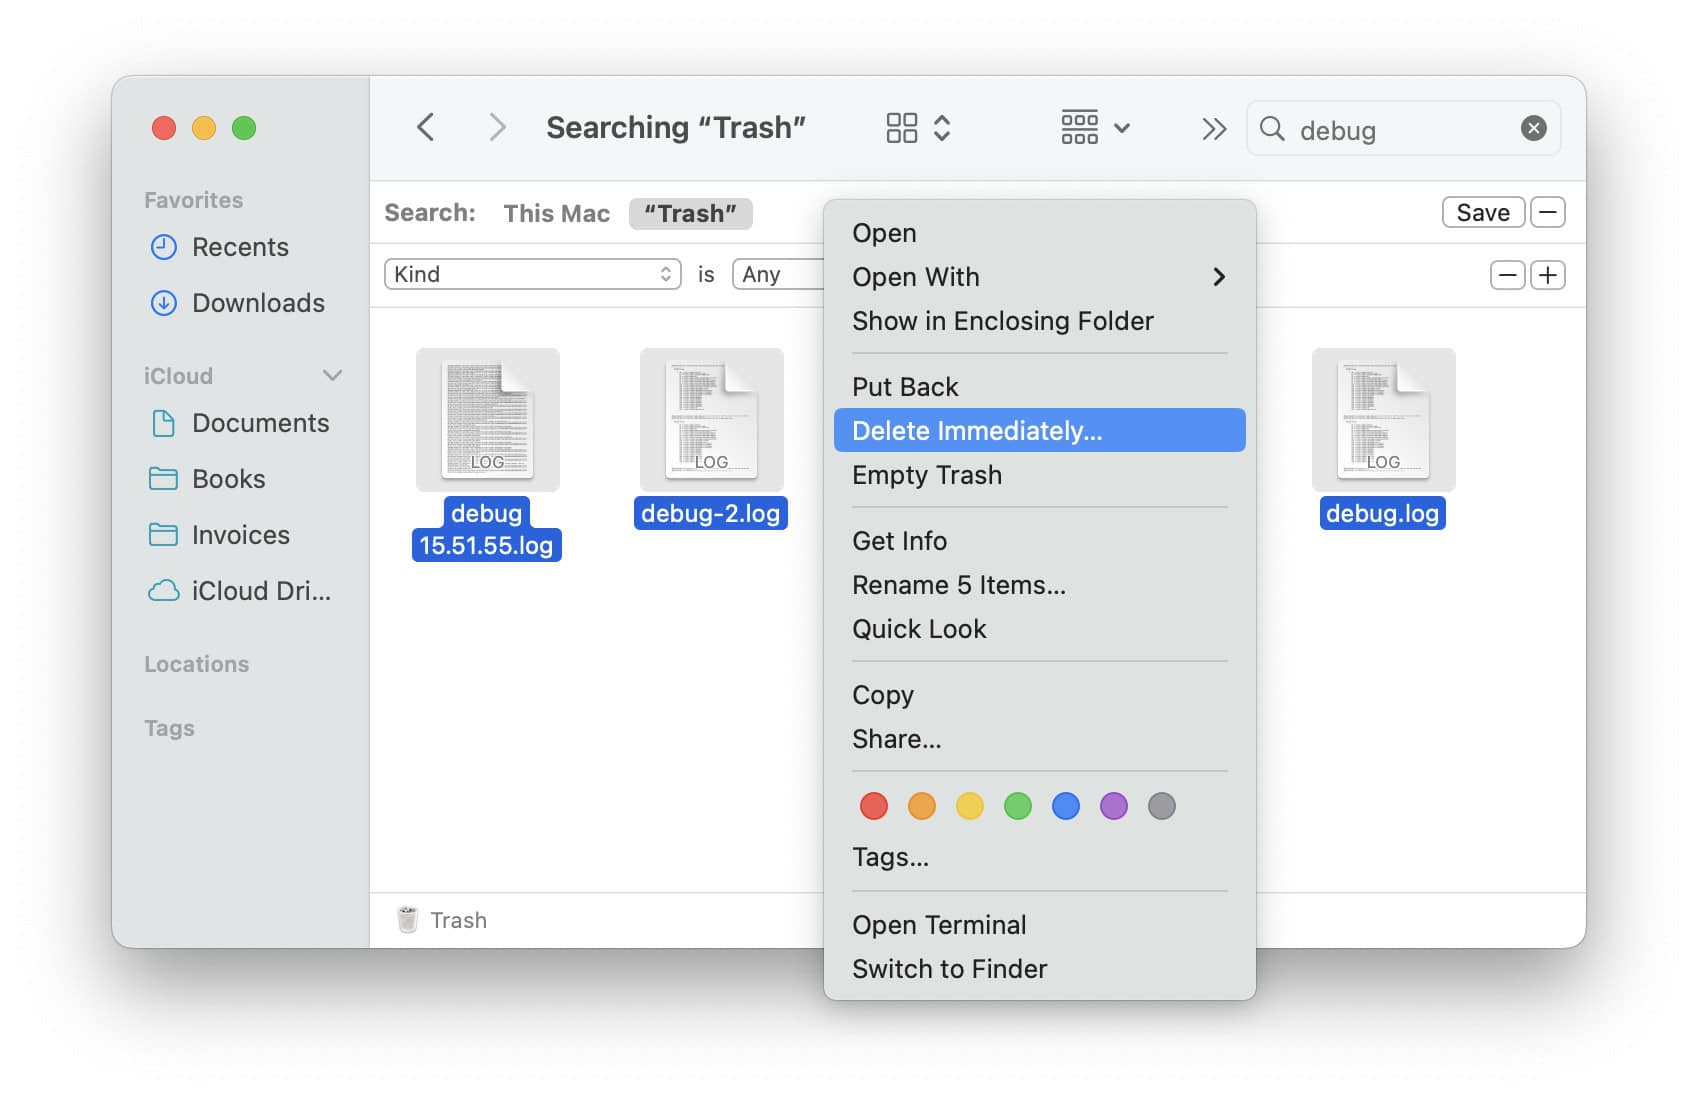
- Click Delete to confirm.
How to Empty the Trash on a Mac: FAQ
Can I disable the “Are you sure…?” prompt?
Yes.
To prevent the Mac from asking you Are you sure you want to permanently erase the items in the Trash? when you empty the Trash:
- Open Finder settings (see above).
- Go to the Advanced tab.
- Turn off Show warning before emptying the Trash.
- Close the Finder’s settings window.
Will files recovered from the Trash be deleted automatically?
No.
Files you have recovered from the macOS Trash are safe, of course, from permanent and automatic deletion until you delete them again.
How can I delete files bypassing the Mac “Trash” altogether?
While you cannot delete files without using the Trash in Finder, you can remove files immediately in Terminal:
- Open Terminal and go to the folder that contains the files you want to delete.
From Finder: You can open Terminal right from Finder (and in the current folder, too). - Type
rm -rffollowed by the file or directory you want to delete.
Important: This deletes all matching files and folders (including all subfolders and files in them) without further prompts.
Here’s why: The-roption has the command remove directories as well as files recursively; the-fargument tries to force the action (ignoring file permissions) and skips confirmations.
With confirmations: Replace-fwith-ito have rm ask to confirm deleting each file.
Dry run: Run the commandls -lwith the same files before to see what will be deleted.
Example:rm -f *ladedu*.txtimmediately deletes all text files with “ladedu” in their name in the current directory. - Press Enter.

(Tested with macOS Tahoe 26.0–26.5, Sequoia 15.2–15.5, Sonoma 14.2–14.6 and Ventura 13.4; first published August 2023, last updated June 2026)