
Looking to pack up a bunch of files and folders into one and save space archiving documents? A server or service on the internet will not accept your file format? Zipped up a project and found strange “__MACOSX” or “.DS_Store” files lurking? Find out here how to zip files on a Mac into a ZIP archive ⤓ (and how to exclude hidden files as well as the “__MACOSX” folders and “.DS_Store” files to boot).
On This Page
How to Create Zip Files on a Mac
Using Finder
Time needed: 2 minutes
To create a ZIP archive for select files and folders on a Mac using Finder.
- Open the folder that holds the files and folders you want to compress into a ZIP file in Finder.
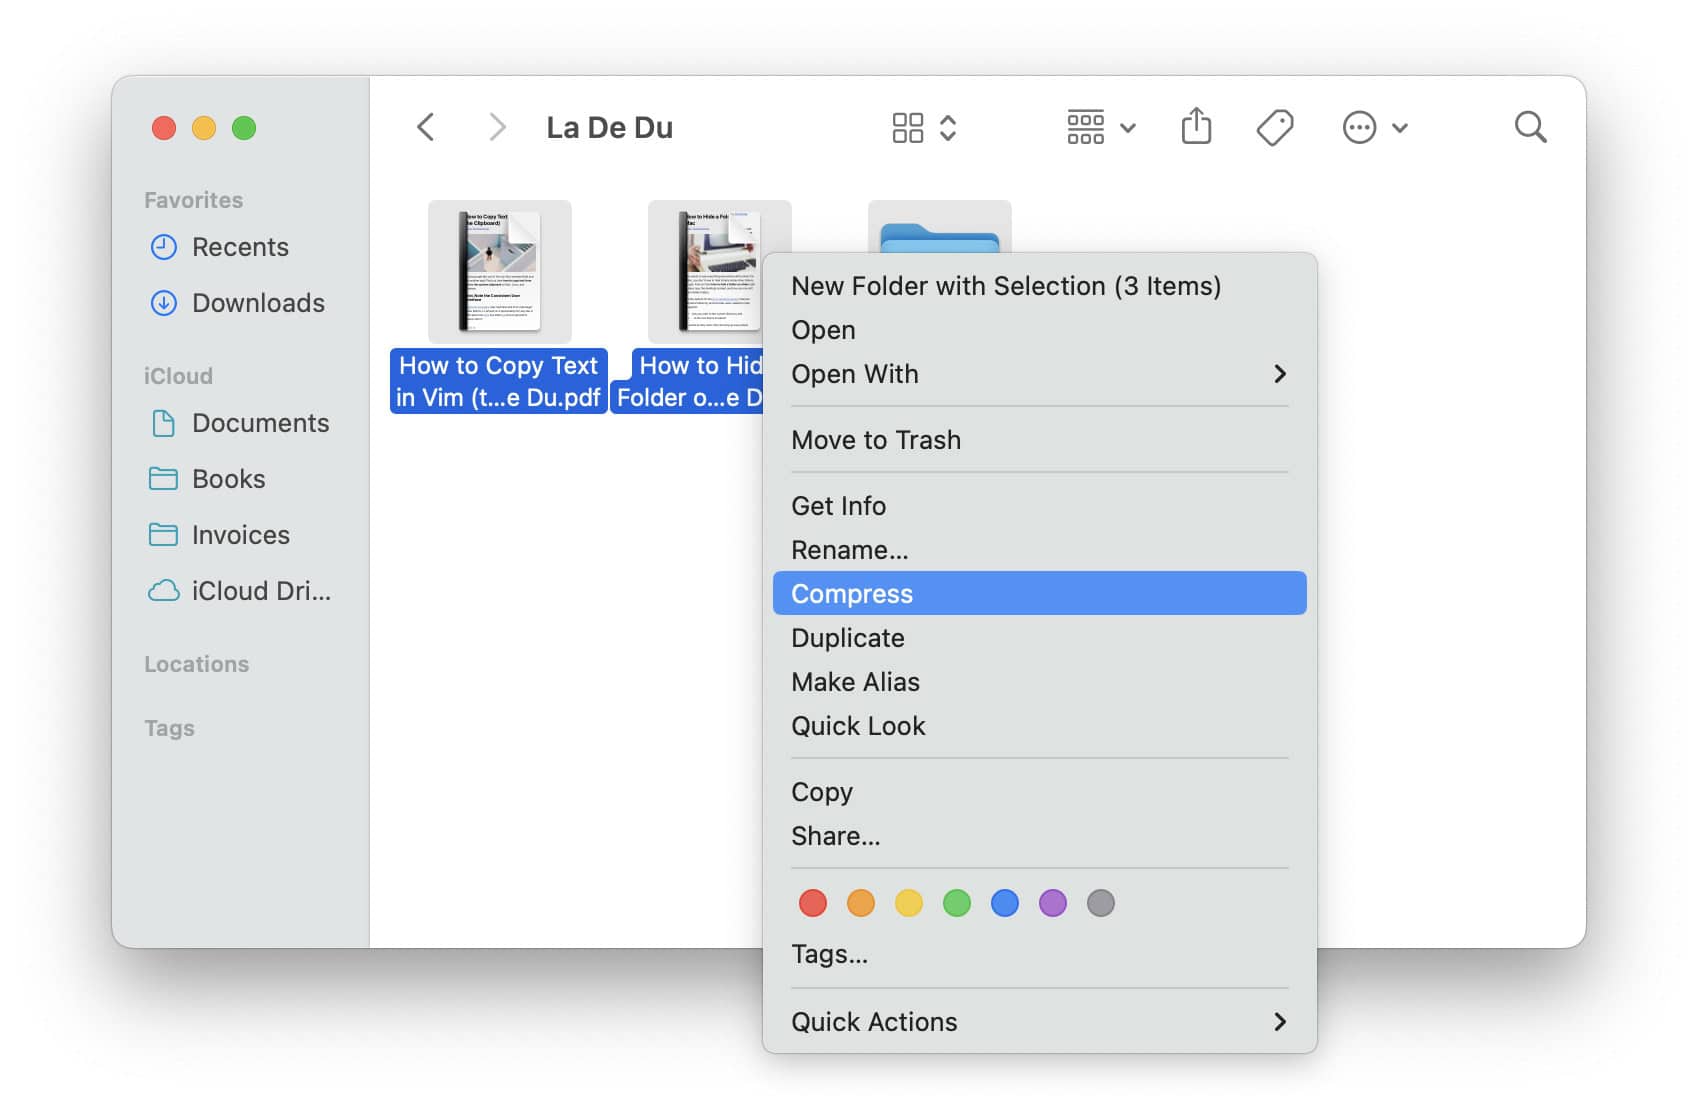
- Highlight all files and folders you want to include.
Here’s how: You can use the mouse to select a group of elements; click any file or folder while you hold the Command key to add it to the selection or remove it again.
Everything: Press Command A to select all files and folders.
Folders: If you include a folder in the selection, macOS will add all files and folders in it to the archive.
Rename: To organize before zipping, you can bulk-rename the selected files right in Finder. - Click on any selected item with the right mouse button.
- Select Compress from the context menu that appears.
Menu bar: You can also select File | Compress in the menu, of course.
- Rename the resulting file Archive.zip if desired.
One file: If you zip a single file, the archive will retain the original filename and attach “.zip”.
“__MACOSX” folder: If you compress files and folders using Mac Finder, macOS will include a “__MACOSX” folder for each document that contains information about the file useful for Finder. The information is not part of the file itself, though, and not necessary to unzip, open or use it. See below for creating ZIP files without “__MACOSX” below.
“.DS_Store” files: Finder may also include hidden .DS_Store files, which hold information for how to display a folder in Finder. You can remove these together with the “__MACOSX” folder from the ZIP file you created; see below.
Their word: Apple include information on zipping and unzipping in the Mac User Guide.
How to Create Zip Files on a Mac without “__MACOSX” and Hidden Files
To compress or consolidate files and folders to a ZIP file and exclude the _MACOSX folder (which Finder habitually adds to the archive):
- Open Terminal in the folder that contains the files or directories you want to zip up.
- Type
zip -r <output> <input files or directories> -x .* */.*.
Output: Replace<output>with the name you want to use for the ZIP file.
Input: Replace<input files or directories>with a list of files or directories you want to compress into the single ZIP file. Type*to compress all files and folders in the current directories or list file and directory names. You can also use wildcards and zip up all HTML files, for example with*.htm*.
The arguments:-rmakes zip go down directories to zip up everything in them;-xexcludes certain files, in this case.* */.*, i.e. hidden files and folders In the current folder as well as in all subfolders, which all start with a period;-ospecifies the name of the output file (without or including the .zip extension).
The unseen: Note that this will exclude hidden folders entirely; visible files inside hidden folders are not included in the ZIP file.
Exampleszip -r ladedu La\ De\ Du -x */.*will compress the directory “La De Du” and all files in it except hidden files to a file called ladedu.zip.zip -r ladedu *.htm* *.txt *.jpg *.jpeg -x .* */.*will archive all HTML, JPEG and text files (excluding any potentially hidden files with those extensions) in the file ladedu.zip.zip -r ladedu * -x .* */.*will zip everything in the current folder and all subfolders excluding hidden files and directories into the file ladedu.zip. - Press Enter.

Works across platforms:
How to Create a ZIP File in Windows
How to Create ZIP Files on Linux (Gnome, KDE, Terminal)
How to Create Zip Files on a Mac: FAQ
Can I include hidden files in archives using zip in Terminal?
Yes.
To include hidden files, omit the -x .* */.* option and use . (period) for what to include.
Example: zip -r ladedu . will archive all files and folder (including all hidden files) to the file ladedu.zip.
Can I include the “__MACOSX” folder on the Terminal?
No.
The __MACOSX folders in ZIP files are created by (and useful to) Finder and Archive Utility.
Avoid extracting “__MACOSX’: How to Unzip Files on a Mac
What information does the “__MACOSX” folder contain
The hidden files in __MACOSX folders in ZIP files contain information about the archived file such as the URL from which it was downloaded, for example.
Can I delete the meta-information (“__MACOSX” and “.DS_Store”) from ZIP files?
Yes.
To remove meta information saved to ZIP files in macOS Finder:
- Open Terminal in the folder that holds the ZIP file.
- Type
zip -d <filename>.zip __MACOSX/\* \*/.DS_Store.
File: Replace <filename> with the ZIP file’s name.
All ZIPs: Usezip -d *.zip __MACOSX/\* \*/.DS_Storeto delete superfluous information from all ZIP files in the current folder.
Backup: For important files, do create a copy of the original ZIP file before you manipulate it; you can usecp <filename>.zip <filename>.zip~, for instance. - Press Enter.
Warnings: The zip command will warn you when the original ZIP file does not contain one of the files to be deleted; you can ignore the warnings.
- Check the ZIP file with
unzip -v <filename>.zip.
Here’s how: This will list all files in the ZIP file. Check none of the unwanted files are still present. - Delete the backup copy using
rm <filename>.zip~.
No more __MACOSX crumbs?
Tips help fuel these email and tech how-tos.
(Tested with macOS Tahoe 26.0–26.5, Sequoia 15.2–15.5, Sonoma 14.3–14.5 and Ventura 13.4; first published August 2023, last updated May 2026)