

[Archived] You never use Paint 3D, but it tends to open for pictures you just mean to view or edit? Find out here how to uninstall Paint 3D from Windows ⤓ (and re-install it when needed).
On This Page
How to Uninstall Paint 3D from Windows
This is an archived article.
Time needed: 5 minutes
To remove Paint 3D from Windows:
- Open the Start menu.
Here’s how: Instead of clicking Start, you can also press the Windows key.
- Select Settings from the menu that has appeared.
Search: You can start typing
settingsto find the Settings app on Windows 11.
Windows keyboard shortcut. Press Windows I to open Windows settings fast. - Open the Apps category.
- Go to Installed apps.
Windows 10: You can skip this step.
- Click the three dots menu for Paint 3D.
Windows 10: Click Paint 3D under Apps & features.
- Now select Uninstall.
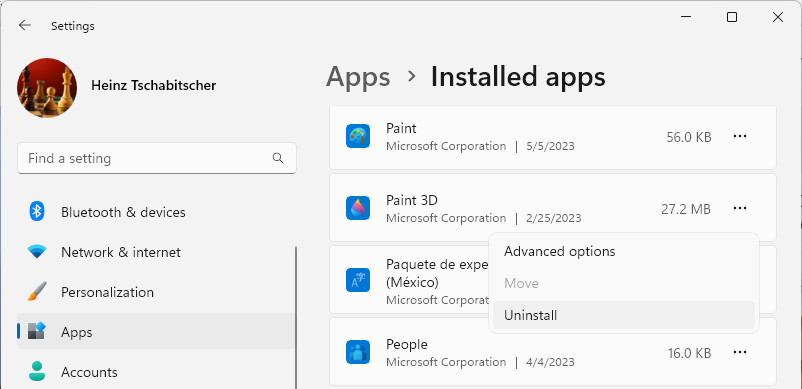
- Select Uninstall again to confirm (under This app and its related info will be uninstalled).
Speaking of “deleting” and “Windows”: How to Delete without Recycle Bin on Windows
Done playing 3D paint?
Tips help fuel these email and tech how-tos.
How to Uninstall Paint 3D from Windows: FAQ
How can I install Paint 3D again on Windows?
Re-installing Paint 3D is just as simple as removing it.
To install Microsoft Paint 3D on Windows:
- Open Paint 3D in the Microsoft Store app.
Search: As an alternative to opening the page directly, search forPaint 3Din Microsoft Store. - Click Get if it is available, otherwise skip this step.
- Now click Install.
- Wait for Completed to appear in place of Install.
Can I remove the “Edit with Paint 3D” command from image context menus?
Yes; uninstalling Paint 3D will not remove the Edit with Paint 3D entry from images' context menus in Windows File Explorer, but you can do so manually yourself:
- Open Registry Editor.
- Go to HKEY_LOCAL_MACHINE\SOFTWARE\Classes\SystemFileAssociations\.jpeg\Shell.
- Export the 3D Edit key.
Back to the context: Re-installing Paint 3D will not automatically add these context menu items back. Do restore your backup or import the following reg file: Edit with Paint 3D Context Menu.reg. - Click on the 3D Edit key with the right mouse button.
- Select Delete from the context menu that appears.
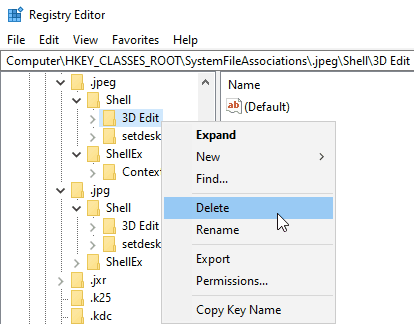
- Now click Yes in the Confirm Key Delete dialog.
- Repeat for the .jpg, .png, .tif, and .tiff file extensions under HKEY_LOCAL_MACHINE\SOFTWARE\Classes\SystemFileAssociations.
(Tested with Windows 11 Version 22H2–23H2 and Windows 10 Version 21H1; first published February 2020, last updated October 2024)